IRS form 1099 is used to calculate and record the money paid to a non-employee. IRS uses a few 1099 forms, but only two forms are famous: QuickBooks 1099-NEC and 1099-MISC. QuickBooks is one of the best accounting software platforms in the market, and the most successful version is QuickBooks Online.
In this article, we will discuss QuickBooks 1099-NEC form, the difference between 1099-MISC and 1099-NEC, Create the 1099-NEC accounts, steps to file 1099-NEC on QuickBooks Desktop, Online, and Mac, print the form 1099-NEC, and details related to the filing status of the QuickBooks form.
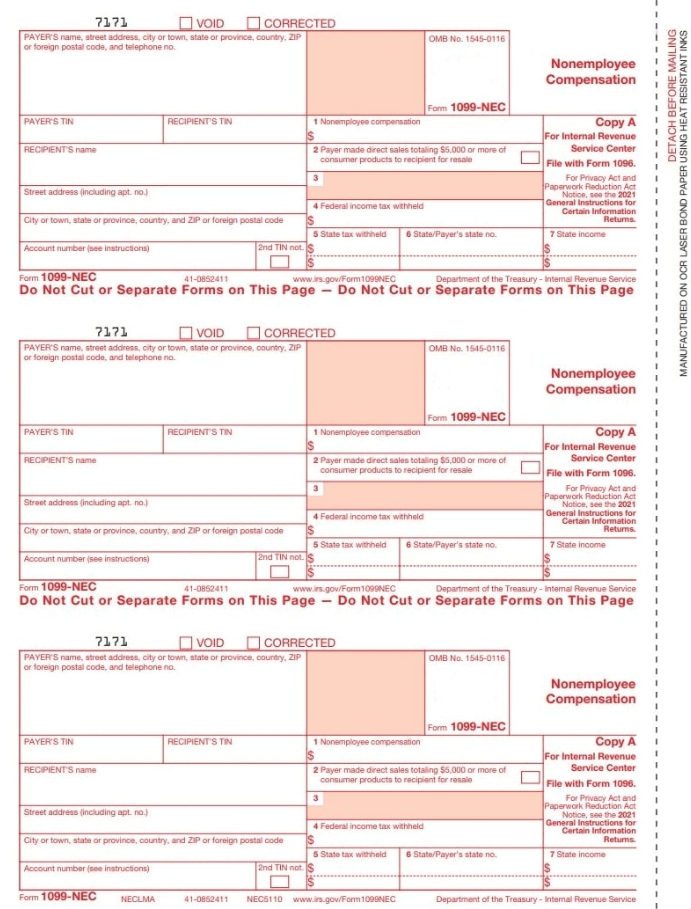
Difference between QuickBooks 1099-NEC and 1099-MISC
There is a slight difference between 1099-NEC and 1099-MISC forms. Here are the requirements to file form 1099-NEC.
- If you paid $600 or more to anyone other than your employee, then you will have to fill out the form 1099-NEC
- If you have withheld the federal or state tax under the rules, then you need to file a 1099-NEC form.
QuickBooks 1099-MISC is used by contractors, vendors, individuals, and attorneys. You need to file the form 1099-MISC if you paid $600 or more to anyone. The tax filing dates are also different on each form:
- QuickBooks 1099-NEC: January 31
- QuickBooks 1099-MISC: March 31.
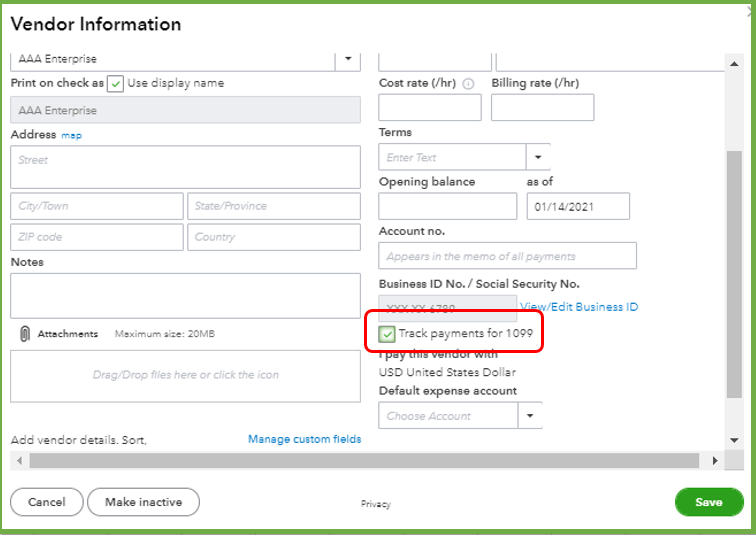
How To Create QuickBooks 1099-NEC Accounts
1099-NEC is a new form, and you will have to create a new account in the QuickBooks software to track the other details. Follow these simple steps to create the 1099-NEC account:
- First of all, launch the QuickBooks app and complete the Sign-in process
- After that, go to the Lists menu and choose the Chart of Account option
- Then, click on the Account option and select the New option
- Choose the account type option between COGS, Other Expense, and Expense
- After that, press the Continue tab and enter the name & details
- Complete the Tax-line Mapping process and select the Save and Close option from the menu.
Steps To File QuickBooks 1099-NEC form
First of all, you will have to file the QuickBooks 1099s. After that, you are ready to file the QuickBooks 1099-NEC or 1099-MISC. You can file the form 1099 NEC in QuickBooks Desktop, QuickBooks Online, and QuickBooks for Mac. Here are the steps to fill out the form:
File QuickBooks 1099-NEC From QuickBooks Online-
If you are using the QuickBooks online, then go through the instructions mentioned below:
- Choose the Reports option and select the 1099 Transactions Detail Report
- Verify the accounts associated with 1099-NEC and 1099-MISC
- Create the 1099 transaction detail report
- Click on the Settings icon and choose the charts of accounts
- Tap new to create a new account
- Follow the on-screen prompts and choose Account Type and Detail Type to proceed
- Name your account and add Description
- Add sub-account and tap Save and Close to add a new account
- Add a journal entry and edit your contractor payments
- Validate the changes on your account
- After that, set up your 1099 accounts
- Create the 1099s in QuickBooks Online to proceed further
- E-file the 1099s form and check the filing status.
File QuickBooks 1099-NEC From QuickBooks Desktop-
If you are using the QuickBooks Desktop application, then follow these basic steps:
- Firstly, backup your QuickBooks backup file
- Go to the Reports section and select the Vendors & Payables option from the menu
- After that, select the 1099 detail or 1099 summary option
- Create the 1099 summary report
- Then, tap the List option and choose the Charts of Account option
- Select the New option and choose the type and expense
- Enter your name and details to create a new QuickBooks account
- Add a journal entry by selecting the General entries from the Company tab
- Edit the existing contractor payments by selecting the Vendor option
- Move your payments to the new account
- Create the summary report file and set up the 1099 accounts
- Update the QuickBooks Desktop application
- Finally, import your QuickBooks data and E-file 1099s.
File QuickBooks 1099-NEC From QuickBooks Desktop For Mac-
If you use QuickBooks Desktop for Mac, then go through the instructions mentioned below:
- Firstly, back up the QuickBooks Desktop file
- After that, create a 1099 summary report file
- Then, create a new account and move the payments to new accounts
- Create the summary report for your account
- Import all your data and follow the on-screen prompts
- E-file the QuickBooks 1099-NEC form.
Get QuickBooks 1099-NEC By Updating The Software
You can update the QuickBooks accounting software to get the Form 1099-NEC. Follow these basic steps:
- Launch the QuickBooks accounting software
- Tap on the Help menu and select the Update QuickBooks Desktop option
- Click on the Update Now option
- Select the Get Updates option to start the downloading process
- Finish the downloading process and relaunch the QuickBooks software
- Finally, tap OK to grant the installation rights.
How To Print The QuickBooks 1099-NEC form
Here are the steps to print the 1099-NEC form on your QuickBooks software:
- Firstly, click on the Vendors option
- Select the 1099 forms from the list
- Click on the Print or File option
- Tap Get Started to create the form 1099s
- Choose your Vendor and tap Continue to proceed further
- Map your QuickBooks account and select the Continue option
- After that, review your payment details and press the Continue tab
- Finally, choose the Print 1099 option from your window.
Troubleshoot The Printing Issue
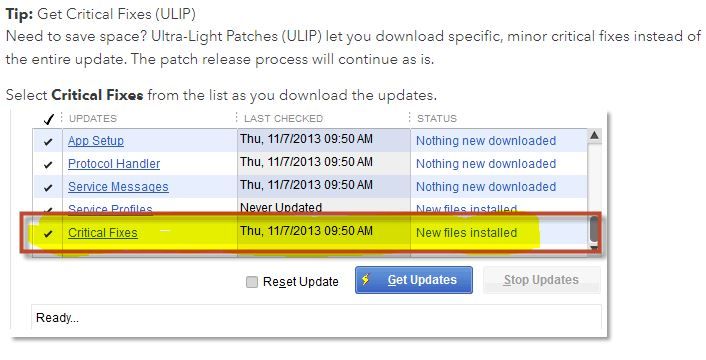
If you face the printing issue while printing the 1099-NEC form, then ensure that you have the latest release of critical fixes. Follow these simple steps to do so:
- Firstly, go to the Help tab from the main menu
- Then, click the Update QuickBooks Desktop option
- Navigate to the Options tab and click the Mark All tab
- After that, select the Save option and tap the Update Now option
- Then, ensure that you have chosen the Critical Fixes option
- Tap the Get Updates option to update the Critical Fixes files
- Close and relaunch the QuickBooks Desktop application
- Finally, tap Yes to install the latest updates.
Check The Filing Status Of QuickBooks 1099-NEC Form
IF you have filed the 1099-NEC form, then here is the filing status of the form:
- Not Submitted: It means the form 1099-NEC or 1099-MISC has not been submitted yet. You can revisit the form section and continue submitting it.
- Submitted: It means the form 1099-NEC or 1099-MISC has been submitted successfully.
- Received by IRS: It means the form 1099-NEC or 1099-MISC has been submitted and accepted by IRS. In other words, the IRS is processing it or approving it. You will also receive the confirmation mail from the IRS within a week of submission.
Conclusion
We hope you will file the QuickBooks 1099-NEC after reading the steps mentioned above. You can file form 1099-NEC on QuickBooks Online, Desktop, and Mac. However, if you face any issues while submitting the form, you may consult our experts. Fegon Group offers advanced accounting services like Bookkeeping, Tax preparation & filing, etc. Use our software services to grow your business.
